 Save to Pinterest
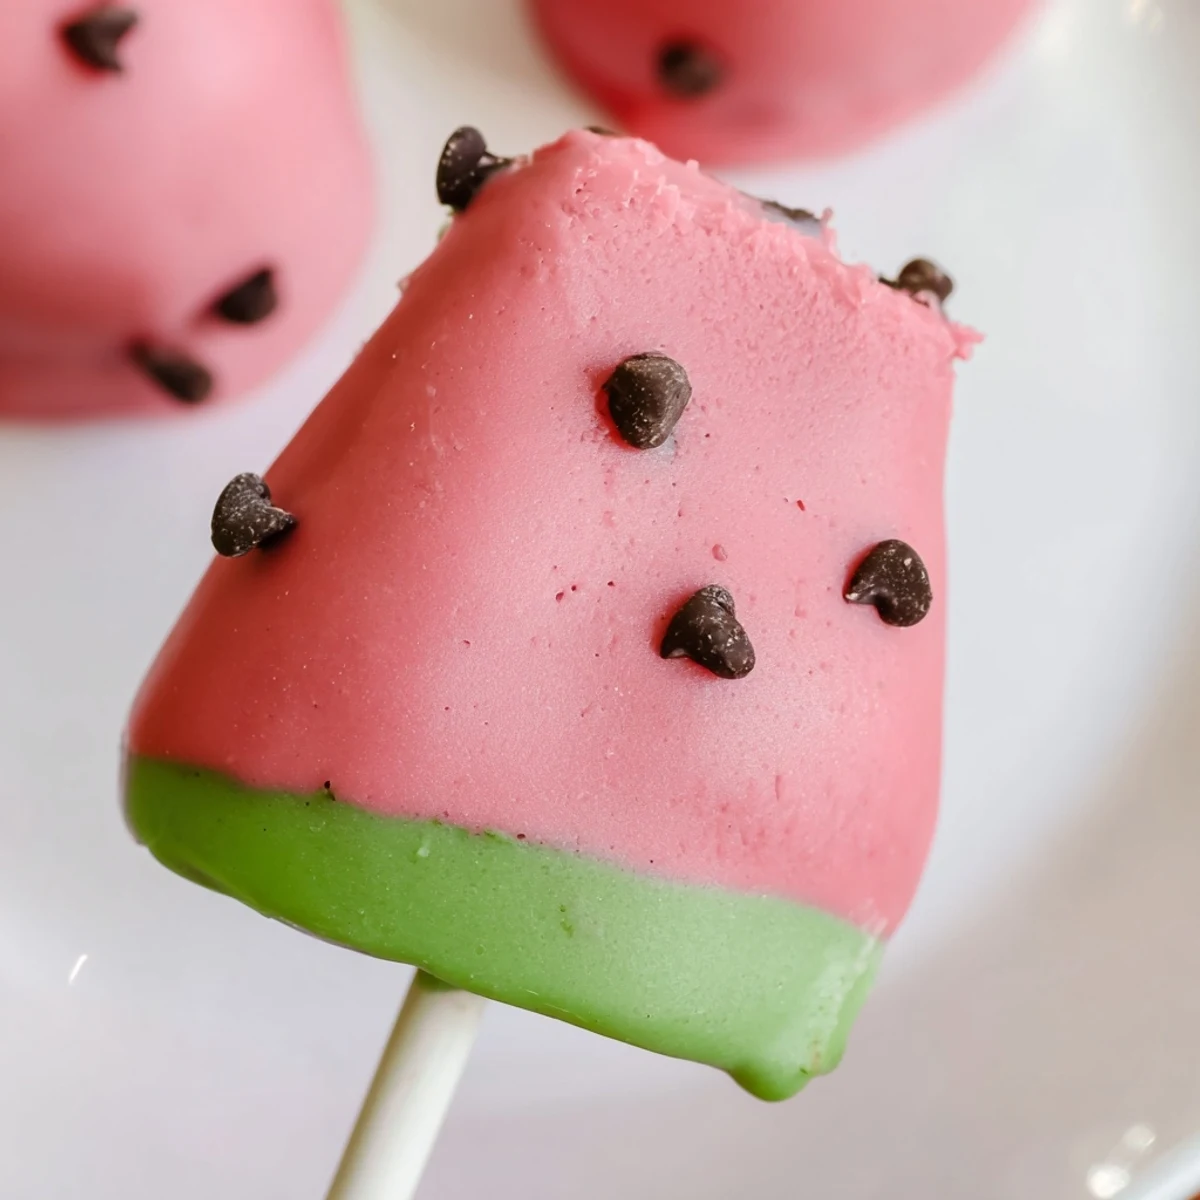
 These playful watermelon cake pops capture summer's essence in every bite. Start with moist vanilla cake mixed with tangy cream cheese frosting, shaped into triangular slices resembling watermelon wedges. The magic happens during coating—a vibrant pink candy melt covers the 'fruit' while green creates the signature rind. Mini chocolate chips add realistic seeds, making these treats nearly too cute to eat.
Perfect for backyard barbecues, pool parties, or children's celebrations, these handheld desserts combine nostalgic cake flavor with whimsical presentation. The thirty-minute active time makes them achievable for bakers of any skill level, while the yield of twenty-four ensures there's plenty to share.
Customization options abound: add watermelon extract for authentic flavor, swap homemade components for store-bought shortcuts, or adapt the base for dietary needs. Serve alongside refreshing lemonade for the ultimate warm-weather dessert experience.
The heat was relentless that July weekend when my niece burst into the kitchen with a magazine page torn out showing watermelon everything. She pointed determinedly at the cake pops and said Auntie we need to make these for the block party. Three bags of pink candy melts later my kitchen counter looked like a confetti explosion but the absolute magic in her eyes when she took her first bite made every sticky fingerprint worth it.
Last summer I brought these to a pool party and watched a grown man actually gasp when he saw the platter. He told me later he spent five minutes convincing his kids they were real watermelon slices before trying one and then proceeded to eat three more. Now every time I see those little pops I remember that afternoon full of laughter sunshine and chocolate seed fingerprints everywhere.
Ingredients
- 1 box vanilla cake mix: The foundation of everything but homemade works beautifully too if you have the time and energy
- 3 large eggs: Room temperature eggs blend better into the batter giving you that perfect tender crumb
- 120 ml vegetable oil: Creates moisture that keeps the cake pops from becoming dry little hockey pucks
- 240 ml water: Just enough liquid to bring everything together into a smooth pourable batter
- 120 g cream cheese softened: This creamy element transforms dry cake crumbs into something magical and moldable
- 60 g unsalted butter softened: Adds richness and helps the frosting hold everything together perfectly
- 120 g powdered sugar: Sweetens the frosting just enough without overpowering the cake flavor
- 1 tsp pure vanilla extract: Do not skip this it makes everything taste more like a real bakery treat
- 300 g pink or red candy melts: The key to that convincing watermelon interior look
- 200 g green candy melts: Creates that authentic rind appearance that fools everyone every time
- 24 lollipop sticks: Essential for turning cake balls into actual handheld pops
- 2 tbsp mini chocolate chips: These become the adorable little seeds that make the design pop
- 1 tbsp vegetable oil: Sometimes needed to thin stubborn candy melts into a dippable consistency
Instructions
- Bake your vanilla cake:
- Prepare according to package directions or your favorite homemade recipe then let it cool completely because warm cake creates gloppy pops that will not hold their shape
- Whip up the frosting:
- Beat together cream cheese butter powdered sugar and vanilla until completely smooth and creamy
- Create the cake pop mixture:
- Crumble your cooled cake into fine pieces then mix in frosting gradually until you have a dough that holds together when squeezed but is not wet or sticky
- Shape into watermelon wedges:
- Form 24 balls then gently flatten one side and create a slight point on the opposite end to mimic that classic watermelon slice silhouette
- Prepare and insert sticks:
- Melt a small amount of green candy melts dip each lollipop stick tip into the chocolate then insert into the flat side of each pop and freeze for 20 minutes to set
- Add the pink watermelon coating:
- Dip each chilled pop into the pink candy melts letting excess drip off then immediately press chocolate chips into the surface as seeds before the coating sets
- Create the green rind:
- Dip just the bottom portion of each pop into the green candy melts creating that signature watermelon edge
- Let them set completely:
- Stand them up in a cake pop stand or styrofoam block until fully hardened then serve or store in the fridge until party time
 Save to Pinterest
 My mom accidentally grabbed purple candy melts instead of pink one year and we ended up with alien watermelon pops that became legendary in our neighborhood. Sometimes the mistakes become the best stories and the kids loved them even more.
Getting That Perfect Shape
The watermelon wedge shape takes practice but the key is working with the cake pop mixture while it is slightly cold. If your hands are getting too warm and the dough is becoming sticky pop the bowl in the fridge for 10 minutes then try again.
Working With Candy Melts
Melting candy coating is an art form that requires patience and low power in the microwave. I learned the hard way that overheating turns those silky melts into a thick lumpy disaster that no amount of oil can fix.
Storage And Serving
These little treats stay fresh in the refrigerator for up to a week if stored in an airtight container with parchment paper between layers. Bring them to room temperature about 30 minutes before serving for the best texture and flavor.
- Make them a day ahead for easy party prep
- Package them individually in clear bags for adorable party favors
- Keep them away from direct sunlight or the coating will start to soften and lose its shine
 Save to Pinterest
 Every batch I make now still reminds me of that first sticky summer afternoon with my niece and the joy of creating something that makes people smile before they even take a bite.
Recipe Q&A
- → How far in advance can I make watermelon cake pops?
-
These cake pops stay fresh for up to one week when stored in an airtight container in the refrigerator. You can prepare the uncoated cake balls and freeze them for up to one month before decorating. Coat and decorate them one or two days before your event for optimal freshness and texture.
- → What if my candy coating is too thick for dipping?
-
Add one teaspoon of vegetable oil or coconut oil to your melted candy melts and stir thoroughly. The fat thins the coating without affecting flavor. Only add small amounts gradually—too much oil can prevent the coating from setting properly. Microwave in 15-second intervals, stirring between each, to maintain smooth consistency.
- → Can I make these without lollipop sticks?
-
Absolutely! Simply skip the sticks and present them as watermelon truffle bites instead. Place them in mini cupcake liners or arrange them on a decorative platter. The stick-free version works wonderfully for dessert buffets, especially where children might be eating. You can also insert decorative toothpicks for easier serving if desired.
- → Why do my cake pops fall off the sticks?
-
This usually happens when the cake mixture is too dry or the sticks aren't properly secured. First, ensure your cake-frosting mixture holds its shape when compressed. Second, always dip the stick tip in melted coating before inserting—this acts as glue. Finally, chill the assembled pops for at least twenty minutes before dipping to help the coating set around the stick securely.
- → How do I get the watermelon shape right?
-
Start by rolling your dough into balls, then gently press two sides against a flat surface to create triangular shapes. Use your fingers to round the curved edge while keeping the bottom flat. Don't worry about perfection—slightly irregular shapes actually look more authentic and rustic. If the dough becomes too soft while working, pop it in the refrigerator for ten minutes to firm up again.
- → Can I use real chocolate instead of candy melts?
-
While possible, real chocolate requires tempering to achieve the same smooth, glossy finish. Candy melts contain palm oil that helps them set firmly at room temperature—perfect for cake pops that may sit out during parties. If using real chocolate, add one tablespoon of vegetable oil per cup to help create a workable consistency, and keep the finished pops refrigerated until serving.